

Ah, finally Fall! The season of pumpkin spice, apples and scarves is here, and we couldn’t be more excited. With a new season comes a new opportunity for inspiration. Shifting from bright colors to warmer, earthier tones, Fall is a chance to let those creative juices refill and venture into new artistic outlets.
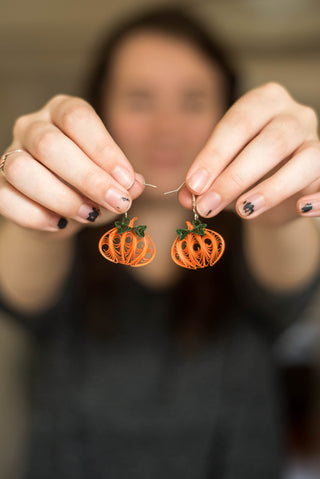
Are you looking to celebrate Fall in a new, unique way? Add these adorable DIY Pumpkin Earrings to your Autumn wardrobe, thanks to this handy tutorial from local artist, Paige Moreland! p.s. We think they would also make the perfect gift for your Halloween-loving friend or a great activity for your girls night in.

What You’ll Need
- Ten ⅛” x 12” strips of orange paper (Paige uses 3 Birds Studio quilling paper)
- Six ⅛” x 3” strips of green paper (Paige uses Quilled Creations quilling paper)
- Two fish hook earrings
- Two jump rings
- Paper glue
- Pliers
- Tweezers
- Scissors or cuticle cutters
Step One
Cut paper to prescribed size listed above using scissors or cuticle cutters. Once you’ve got your materials set, insert a strip of orange paper into the slot of your quilling tool (If you don’t have a quilling tool, try creating your own using a cork and needle!). Wind the paper around the tool and itself, stacking the paper neatly. Use your non-dominant hand to keep the paper in line.
Step Two
Once you’ve wound the paper into a neat circle, release your grip and push the paper up and off the tool with your thumb. Using your “pincher fingers,” squeeze both ends of the circle to form a diamond shape. This will be the center of your pumpkin. Once you’ve achieved the desired shape, glue the outside end of the paper down.

Step Three
Repeat step one. Again, once the paper is wound, release your grip and remove the paper from the tool. This time, use both hand to pinch the paper into a crescent moon shape. This will be one of the four outer pieces of the pumpkin. Repeat three times.
Step Four
Insert a strip of green paper in your quilling tool. Neatly wind into a circle, using your non-dominant hand to guide the paper. Once the paper is wound, gently release and remove using your thumb. Gently squeeze the paper into an oblong, diamond shape. Then, use your thumb or pointer finger to push one end of the paper towards the center. This should create a heart shape. Glue the end of the paper. This will be a leaf on your pumpkin. Repeat.

Step Five
Insert another strip of green paper in your quilling tool and wind. Remove gently, maintaining a tight circle. Glue the ends of the paper. This will function as the connector to the jump ring.
Step Six
Starting with your first orange diamond piece, add glue to the flat outer edge of the paper and add one orange crescent shape to each side. Use tweezers to pinch the layers of paper together and maintain control of the shape. Add glue to flat outer edges on crescent shapes and add one more crescent to each side. Use tweezers to pinch paper. Let dry.

Step Seven
Add glue to top of the now pumpkin shape where the five orange pieces meet. Use tweezers to pinch tops of paper and create a “stem.” If sections become unstuck, add glue as needed. Let dry.
Step Eight
Place two drops of glue on front of pumpkin at base of “stem.” Place both green leaves on glue dots with pointed signs pointing in towards each other. Place one glue dot on right or left side of stem. Add circular green piece flat side down on glue. Use slight pressure and tweezers to ensure security. Let dry.

Step Nine
Use pliers to open jump ring (This can be made easier by using two pairs of pliers!). Thread jump ring through fish hook earring and round green piece at top of pumpkin. Use pliers to close jump ring.
Step Ten
Repeat steps one through nine to complete second earring. Wear or gift and enjoy!
Paige is a paper quiller and printmaker with imaginative ideas. Check out more of her work on Instagram, and purchase earrings, custom paper pieces and more from her Etsy shop.
Watch the video below to see Paige make the earrings herself.
Want to see Paige's work in person? She will be selling goods at our October, November and December Brainery Bazaars! Paige also has work on display in our Gallery Room through the end of 2018.